Threading with Boost - Part I: Creating Threads
Boost is an incredibly powerful collection of portable class libraries for C++. There are classes for such tasks as date/time manipulation, filesystem interfaces, networking, numerical programming, interprocess communication and much more.
The Boost documentation is substantial, but can still be daunting to new users. So this article is the first of a series on using Boost, starting with basic threading. It aims to provide an accessible introduction, with complete working examples.
First, this article assumes you know about general threading concepts and the basics of how to use them on your platform. (For a refresher, see the Wikipedia article on Threads.) Here I focus specifically on how to use Boost threads in a practical setting, starting from the basics. I also assume you have Boost installed and ready to use (see the Boost Getting Started Guide for details).
This article looks specifically at the different ways to create threads. There are many other techniques necessary for real multi-threaded systems, such as synchronisation and mutual exclusion, which will be covered in a future article.
Overview
A boost::thread object represents a single thread of execution, as you would normally create and manage using your operating system specific interfaces. For example: on POSIX systems, a Boost thread uses the Pthreads API, and on Win32 it uses the native CreateThread and related calls. Because Boost abstracts away all the platform-specific code, you can easily write sophisticated and portable code that runs across all major platforms. A thread object can be set to a special state of not-a-thread, in which case it is inactive (or hasn’t been given a thread function to run yet).
A boost::thread object is normally constructed by passing the threading function or method it is to run. There are actually a number of different ways to do so. I cover the main thread creation approaches below.
Code Examples
All the code examples are provided in the repository below, which you can use for any purpose, no strings attached. (The usual disclaimer is that no warranties apply!) And just as Boost runs on many platforms (ie. Windows, Unix/Linux, Mac OS X and others) the example code should be similarly portable. Clone the source with Mercurial, or download a zip here:
- Mercurial repository: https://bitbucket.org/gavinb/boost_samples/
There is a separate example program for each section below, and a common Bjam script to build them all (Jamroot). Bjam is the Boost build system, a very powerful (but notoriously difficult to learn, and worthy of a whole series of articles).
Having said that, you are certainly not obliged to use Bjam. It is still worth knowing how to build applications manually before relying on scripts, so here is an example command line for manual compilation on my system (Mac OS X with Boost installed from MacPorts):
g++ -I/opt/local/include -L/opt/local/lib -lboost_thread-mt -o t1 t1.cpp
All this does is add an include path (with the -I option) pointing to the root of the boost headers, add the library search path (with the -L option) and link in the threading library (boost_thread-mt). You can use the above as the basis for writing our own Makefile if you prefer, or creating build rules in your IDE of choice.
Doing ‘Real’ Work
And before we dive in, a quick note on doing “real work”… In the examples below, a simple sleep call is used to simulate performing actual work in the threads. This is simply to avoid cluttering up the examples with code that would take some finite time to execute but would otherwise be irrelevant.
The simplest way to sleep for a given duration using Boost is to first create a time duration object, and then pass this to the sleep method of the special boost::this_thread class. The this_thread class gives us a convenient way to refer to the currently running thread, when we otherwise may not be able to access it directly (ie. within an arbitrary function). Here’s how to sleep for a few seconds:
// Three seconds of pure, hard work!
boost::posix_time::seconds workTime(3);
boost::this_thread::sleep(workTime);
In the main() function, we then wait for the worker thread to complete using the join() method. This will cause the main thread to sleep until the worker thread completes (successfully or otherwise).
The observant reader will wonder then what the advantage is in spawning a thread, only to wait for it to complete? Surely that serialises the execution path and places us firmly back in sequential world? What is the point of spawning a thread? Well, until we figure out how to use the synchronisation mechanisms, this is the most straightforward approach to illustrate thread creation. And knowing ow to ‘join’ threads is also very important. To synchronise the completion of a thread, we wait for it to finish by calling workerThread.join().
The general structure of the examples below is shown in the following sequence diagram:
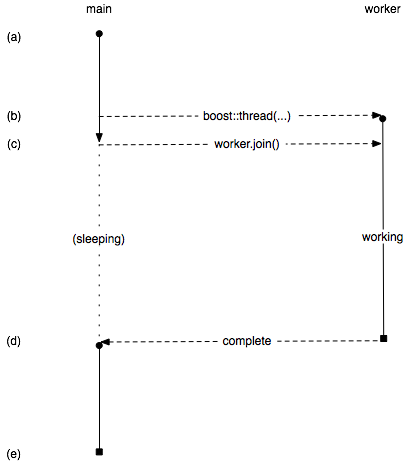
The application starts, and the main thread runs at (a). Then at (b), the main thread spawns the worker thread by constructing a thread object with the worker function. Right after, at (c), the main thread calls join on the thread, which means it will go to sleep (and not consume any CPU time) until the worker thread has completed. As soon as the worker thread is created at (b), it will start execution. At some point later at (d), the worker completes. Since the main thread was joining on its completion, main wakes up and continues running. It finishes at (e) and the process terminates. Each of the examples below follow this general scheme - the difference lies in how the threads are created.
Type 1: A Thread Function
The simplest threading scenario is where you have a simple (C-style) function that you want to run as a separate thread. You just pass the function to the boost::thread constructor, and it will start running. You can then wait for the thread to complete by calling join(), as shown above.
The following example shows how. First, we include the correct Boost thread header, create the thread object and pass in our worker function. The main thread in the process will then wait for the thread to complete.
#include <iostream>
#include <boost/thread.hpp>
#include <boost/date_time.hpp>

void workerFunc()
{
    boost::posix_time::seconds workTime(3);

    std::cout << "Worker: running" << std::endl;

    // Pretend to do something useful...
    boost::this_thread::sleep(workTime);

    std::cout << "Worker: finished" << std::endl;
}

int main(int argc, char* argv[])
{
    std::cout << "main: startup" << std::endl;

    boost::thread workerThread(workerFunc);

    std::cout << "main: waiting for thread" << std::endl;

    workerThread.join();

    std::cout << "main: done" << std::endl;

    return 0;
}
When you run the program, you should see output similar to the following:
% ./t1
main: startup
main: waiting for thread
Worker: running
Worker: finished
main: done
It’s as simple as that! This created a thread and ran it, and you would have seen a pause while the worker thread was running (ok, busy sleeping!). Later on, we’ll do something a bit more substantial. But this example shows the absolute minimum code required to start a simple thread. Simply pass your function to the boost::thread constructor.
Type 2: Function with Arguments
So the above function wasn’t terribly useful by itself. We really want to be able to pass in arguments to the thread function. And fortunately, it’s very easy - you simply add parameters to the thread object’s constructor, and those arguments are automagically bound and passed in to the thread function.
Let’s say your thread function had the following signature:
void workerFunc(const char* msg, unsigned delaySecs) //...You simply pass the arguments to the thread constructor after the name of the thread function, thus:
boost::thread workerThread(workerFunc, "Hello, boost!", 3);This example is called ‘t2’ in the source examples.
Type 3: Functor
A functor is a fancy name for an object that can be called just like a function. The class defines a special method by overloading the operator() which will be invoked when the functor is called. In this way, the functor can encapsulate the thread’s context and still behave like a thread function. (Functors are not specific to threads, they are simply very convenient.)
This is what our functor looks like:
class Worker
{
public:

    Worker(unsigned N, float guess, unsigned iter)
            : m_Number(N),
              m_Guess(guess),
              m_Iterations(iter)
    {
    }

    void operator()()
    {
        std::cout << "Worker: calculating sqrt(" << m_Number
                  << "), itertations = "
                  << m_Iterations << std::endl;

        // Use Newton's Method
        float   x;
        float   x_last = m_Guess;

        for (unsigned i=0; i < m_Iterations; i++)
        {
            x = x_last - (x_last*x_last\-m_Number)/
                    (2\*x_last);
            x_last = x;

            std::cout << "Iter " << i << " = "
                  << x << std::endl;
        }

        std::cout << "Worker: Answer = " << x << std::endl;
    }

private:

    unsigned    m_Number;
    float       m_Guess;
    unsigned    m_Iterations;
};
This worker functor calculates a square root of a number using Newton-Rhapson’s method, just for fun (ok, I got bored putting sleep in all the threads). The number, a rough guess and the number of iterations is passed to the constructor. The calculation (which is in fact extremely fast) is performed in the thread itself, when the operator()() gets called.
So in the main code, first we create our callable object, constructing it with any necessary arguments as normal. Then you pass the instance to the boost::thread constructor, which will invoke the operator()() method on your functor. This becomes the new thread, and runs just like any other thread, with the added benefit that it has access to the object’s context and other methods. This approach has the benefit of wrapping up a thread into a convenient bundle.
int main(int argc, char* argv[])
{
    std::cout << "main: startup" << std::endl;

    Worker w(612, 10, 5);
    boost::thread workerThread(w);

    std::cout << "main: waiting for thread" << std::endl;

    workerThread.join();

    std::cout << "main: done" << std::endl;

    return 0;
}
Note: A very important consideration when using functors with boost threads is that the thread constructor takes the functor parameter by value, and thus makes a copy of the functor object. Depending on the design of your functor object, this may have unintended side-effects. Take care when writing functor objects to ensure that they can be safely copied.
Type 4: Object method I
It is frequently convenient to define an object with an instance method that runs on its own thread. After all, we’re coding C++ here, not C! With Boost’s thread object, this only slightly more work than making a regular function into a thread. First, we have to specify the method using its class qualifier, as you would expect, and we use the & operator to pass the address of the method.
Because methods in C++ always have an implicit this pointer passed in as the first parameter, we need to make sure we call the object’s method using the same convention. So we will pass the object pointer (or this depending on whether we are inside the object or not) as the first parameter, along with any other actual parameters we might have after that, thus:
Worker w(3);
boost::thread workerThread(&Worker::processQueue, &w, 2);
As an aside, take care in your own code that you don’t accidentally allocate an object on the stack in one place, spawn a thread, then have the object go out of scope and be destroyed before the thread has completed! This could be the source of many tricky bugs.
The full listing is essentially the same. To pass additional parameters to the method, simply add them in the constructor to the thread object after the object pointer.
Type 5: Object method II
You may want to create a bunch of objects that manage their own threads, and can be created and run in a more flexible manner than keeping around a bunch of objects along with their associated threads in the caller. (I think they call this encapsulation.)
So our final example places the thread instance within the object itself, and provides methods to manage them. Since the thread object exists as an instance member (as opposed to a pointer), what happens in the constructor? In particular, what if we don’t want to run the thread at the same time as we create our object? Fortunately, the default constructor for the thread creates it in an “invalid” state, called not-a-thread, which will do nothing until you assign a real one to it (in our start method, for example).
So now our class declaration has the following data member added:
//...
private:
    boost::thread    m_Thread;
//...
The Worker::start() method spawns the thread which will run the processQueue method. Notice how we pass in this as the first bound parameter? Because we are using an instance method (and not a class method or regular function), we must ensure the first parameter is the instance pointer. The N parameter is the first actual parameter for the thread function, as can be seen in its signature.
void start(int N)
{
    m_Thread = boost::thread(&Worker::processQueue, this, N);
}
The join method is very simply:
void join()
{
    m_Thread.join();
}
which means our main function becomes no more than:
Worker worker;

worker.start(3);

worker.join();
This encapsulation of the threading can be very useful, especially when combined with patterns such as the Singleton (which we will look at in a future article).
Conclusion
We have seen a variety of techniques for creating threads using the Boost threading library. From simple C functions to instance methods with parameters, the thread class permits a great deal of flexibility in how you structure your application.
Future Articles
In later installments, we will look at synchronisation methods, mutexes, and all sorts of other interesting techniques.
Please leave a comment below, with any questions or feedback you may have. Too long? Too brief? More details required? Something confusing? Let me know.
Archived Comments
AUTHOR: saesh DATE: 06/10/2009 11:32:39 PM nice article. helped me to get into thread. thank you.
looking forward for an article about synchronization though.
AUTHOR: tflmike DATE: 06/23/2009 02:45:13 PM A good tutorial with a clear explaination for beginning to work with boost threads, your article cleared it up for me, thank you.
AUTHOR: paolo DATE: 08/01/2009 02:02:33 AM great, thanks a lot. it saved me one hour of hopeless searching over the internet…
AUTHOR: Zach DATE: 08/08/2009 02:57:34 AM OMG, Thank you so much for taking your time to do this. I have learn much and take much from this please continue
AUTHOR: Zach DATE: 08/08/2009 04:12:02 AM Can you please do tutorial on multithreading with Boost C++ :)
AUTHOR: Leandro DATE: 08/31/2009 03:25:08 AM Very nice article!!! It’s hard to find good articles like this about the Boost Thread library. Please, write about synchronization and the correlated stuffs.
Good work!!! Thanks!!!
AUTHOR: Marian DATE: 09/04/2009 07:43:29 PM Superb! I’m only beginer in c++ and this way of explanation is really useful for me. Thank you and don’t forget to continue :-)
AUTHOR: Yuriy DATE: 09/18/2009 10:20:18 PM Easy to understand. Very helpful! Thanks a lot!
AUTHOR: Raby Whyte DATE: 09/29/2009 02:07:59 AM Very helpful indeed. Thanks :) Keep ‘em coming
AUTHOR: sk DATE: 10/07/2009 02:40:56 AM Quite good article. Hope you can have a time for your future ones about boost thread
AUTHOR: murli Dhar DATE: 10/26/2009 02:56:09 AM
Wow! That was a GR8 piece of article. Extremely well written. It is unbelieveable that there are people like you out there,you can put some good work out there for the community without expecting anything back.
Keep it up!
Murli
AUTHOR: Alan Orcharton DATE: 10/30/2009 08:30:57 AM Thanks - a great summary!! to help me with everythng I needed get started using boost threads
AUTHOR: Cuong Bui DATE: 04/16/2010 03:37:30 PM Very excellent article. From this, I get more knowlegde into threading with Boost.
Many thanks, Cuong Bui